缘起
我是一个Ruby程序员,最近开始学习Elixir。我惊叹于Elixir和Phoenix展现的技术魅力,并很快喜欢上了这个新东西。就像Rails之于Ruby一样,Phoenix使得Elixir变得流行起来,原因就在于Elixir使得开发人员能够高效的编写出性能优秀,稳定性好的应用程序,并且很容易使用这些应用处理实时数据。
写这篇博文时,我只有大约一周的Phoenix使用经验。我写这篇博文的目的就是趋势自己从不同的角度思考正在解决的问题,以期获得对这门语言和框架更深入的理解。如果你在代码中发现任何错误或有改进的建议,欢迎给我来信或者提交pull request!
如果你和我一样也是个Elixir新手,我推荐你阅读 Programming Elixir 和 Programming Phoenix ,这两本书全面的阐述了Elixir和Phoenix的基本要点。
我们要做什么
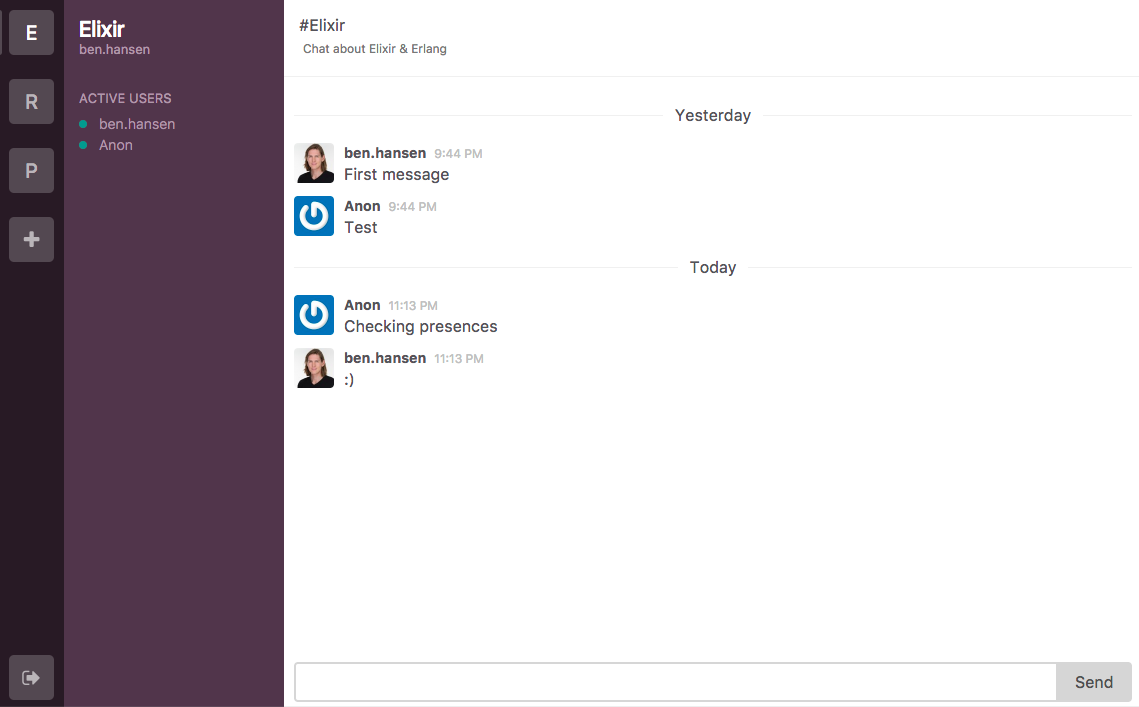
为了向我喜爱的聊天应用Slack致敬,我将打造一个高仿版的Slack,我叫它Sling。为了让这篇博文简洁、完整、可读,我只实现Slack的部分功能,但是要实现的这部分功能足够我们习得Phoenix的基本原理。
Slack有team的概念,并且每个team有若干个channel。team成员能够加入到channel,channel就是聊天的地方。简化起见,我们就不创建team这个功能了,取而代之的是我们将创建room,每个注册用户都能加入到room中,并且在room中聊天。
我们会使用牛x的Phoenix Presence Module展示当前room中的在线用户。
我将尽可能详尽的展示出我是如何构建这个应用的,为此我会保持小增量的git commit。并且在每次提交后留下git diff的链接。
技术栈
服务器端
前端
由于我的技术经验是使用Ruby构建web应用,所以熟悉Rails的读者对于我写的东西会更易于理解。我假定你熟悉JavaScript和ES6。由于这不是React 教程,所以我会尽量解释React组件相关的逻辑,但是不会深究。
如果你还没有安装Elixir或者Phoenix,请看这里
项目结构
对于我们要构建的应用而言,真实项目一般会创建两个独立的代码仓库,一个用于放置Phoenix API,另一个用于放置React App。但是为了使我们的博文清楚明了,我将代码放置在同一个仓库中。目录结构如下:
sling/
    |--- api/
        (phoenix app)
    |--- web/
        (react app)
开始吧!少年。
创建Phoenix应用
创建一个新的文件夹作为我们的代码仓库
mkdir sling
cd sling
生成新的Phoenix应用,我们使用Phoenix直接作为JSON API。所以不需要默认安装的asset manager, 使用参数--no-brunch;也不需要html模板和浏览器端的路由,使用参数--no-html
mix phoenix.new sling --no-html --no-brunch
mv sling api
创建React应用
使用 create-react-app初始化React App,这是一个强大的工具,零配置搭建我们的前端应用。
安装 create-react-app命令行工具
npm i -g create-react-app
创建React App
create-react-app sling
mv sling web
牛叉吧,我们已经初始化好了后端的Phoenix API和前端的React App。
我们第一个正式的提交 init commit
配置Phoenix项目
首先配置数据库,开发环境下默认的数据库配置位于该文件sling/api/config/dev.exs, PostgreSQL默认用户密码均为 postgres 。安全起见我们新建一个文件dev.secret.exs,用于存放私人的数据库配置信息,覆盖掉默认的数据库连接配置。这样一来也便于别人使用我们的代码。将dev.secret.exs加入到.gitignore中(由于新建的配置文件是私有信息所以不必提交),内容如下:
use Mix.Config

config :sling, Sling.Repo,
  username: "your_postgres_user",
  password: "your_postgres_password"
在dev.exs的末尾添加 import "dev.secret.exs",这样我们的私有配置才能生效。
# contents above

import_config "dev.secret.exs"
创建数据库(当前所在路径为sling/api)
mix ecto.create
数据库创建完成后,启动Phoenix App 。
mix phoenix.server
访问 http://localhost:4000, 正常情况会报错,原因在于我们的Phoenix App 只用做API,没有配置网页浏览相关的路由。
Phoenix已经配置完成,接下来我们配置 React App。
配置React项目
create-react-app已近初始化了一个可运行的app, npm start, 访问 http://localhost:3000,就能看到初始化的react app。我们要配置自己的redux react-router, 所以删除掉web/src目录下的所有文件。
另,我们将使用最新的JavaScript依赖管理工具Yarn, 安装指南在此.
在这个前端应用中有许多第三方库我们需要使用,一次性全部将其安装(当前目录是sling/web)
yarn add aphrodite lodash md5 moment phoenix react-redux react-router@4.0.0-alpha.5 redux redux-form redux-thunk
你应该注意到我们使用v4-alpha版本的react-router, 其相较于v2版本的react-router有很多重大的改变。借这个机会我们一并学一学v4-alpha版react-router, 期待v4正式版尽快发布,如有变化到时我会更新博文。
我将使用Airbnb’s styleguide,其中用到了eslint和flow,所以接下来我们安装开发环境下用到的第三方库。
yarn add babel-eslint eslint eslint-config-airbnb eslint-plugin-flowtype eslint-plugin-import eslint-plugin-jsx-a11y eslint-plugin-react --dev
Linting rules的配置完全依赖于个人的喜好,下面是我自己用的.eslintrc文件。(react/no-unused-prop-types 规则被disable掉了,原因是和flowtype有冲突)
{
  "parser": "babel-eslint",
  "plugins": ["react", "flowtype"],
  "extends": ["airbnb", "plugin:flowtype/recommended"],
  "rules": {
    "react/jsx-filename-extension": 0,
    "import/prefer-default-export": 0,
    "react/no-unused-prop-types": 0,
    "camelcase": 0
  },
  "globals": {
    "fetch": true,
    "window": true,
    "document": true,
    "localStorage": true
  }
}
配置React/Redux
React项目有各种各样的目录结构,当然都是基于应用场景权衡的结果。就我们的项目而言,创建containers目录用于存放和redux store 连接相关的组件。创建components目录,存放其他组件。创建actions和reducers目录分别用于存放action和reducer相关的文件。创建store目录存放redux store相关的配置文件。我们着手开始吧。
创建app的入口文件 sling/web/src/index.js, 这个文件需要导入redux store配置文件(稍后创建), App容器组件,并挂载到 index.html 的<div id="root" />节点下。
import React from 'react';
import ReactDOM from 'react-dom';
import { Provider } from 'react-redux';
import store from './store';
import App from './containers/App';

ReactDOM.render(
  <Provider store={store}>
    <App />
  </Provider>
  , document.getElementById('root')
);
创建上面提到的redux store配置文件,引入reducers文件(稍后创建),使用redux-thunk 处理异步操作和Promises。
import { createStore, applyMiddleware } from 'redux';
import thunk from 'redux-thunk';
import reducers from '../reducers';

const middleWare = [thunk];

const createStoreWithMiddleware = applyMiddleware(...middleWare)(createStore);

const store = createStoreWithMiddleware(reducers);

export default store;
创建reducer根文件sling/web/src/reducers/index.js,这个文件用于汇总其他的reducer文件,但是现在我们只需要用redux-form使reducer 能正常工作即可。我们不直接返回配置参数的combineReducers函数,相反,当logout时我们强制返回带undefined参数的appReducer,这样就会强制初始化所有reducer的state(也就是强制清理登出用户的redux state,不会让其污染下一个login用户的state)
import { combineReducers } from 'redux';
import { reducer as form } from 'redux-form';

const appReducer = combineReducers({
  form,
});

export default function (state, action) {
  if (action.type === 'LOGOUT') {
    return appReducer(undefined, action);
  }
  return appReducer(state, action);
}
现在我们来创建App组件,在这个组件中我们要到了v4版的react-router 来配置页面路由。目前我们只有两个路由,一个是Home路由,另一个是404页面。
// @flow
import React, { Component } from 'react';
import { BrowserRouter, Match, Miss } from 'react-router';
import Home from '../Home';
import NotFound from '../../components/NotFound';

class App extends Component {
  render() {
    return (
      <BrowserRouter>
        <div>
          <Match exactly pattern="/" component={Home} />
          <Miss component={NotFound} />
        </div>
      </BrowserRouter>
    );
  }
}

export default App;
目前我们的Home页面只是简单的组件
// @flow
import React from 'react';

const Home = () => (<div>Home</div>);

export default Home;
NotFound组件
// @flow
import React from 'react';
import { Link } from 'react-router';

const style = { margin: '2rem auto', textAlign: 'center' }
const NotFound = () =>
  <div style={style}>
    <p>Page not found</p>
    <p><Link to="/">Go to the home page →</Link></p>
  </div>;

export default NotFound;
好,redux的基本配置已经完成。
到目前为止,我们的前端App和后端API还无法通讯,不过也好,本篇博文就此结束。下篇博文我们将实现前端和后端的通讯,并且添加用户账户和用户身份认证。
原文链接:Let’s Build |> a Slack Clone with Elixir, Phoenix, and React (part 1 — Project setup)